No results found
Loading...
“They did something amazing… they took away that scary feeling of ‘I can’t do it’”
– Dr. Joeli Marrero, Cold Spring Harbor Laboratory DNA Learning Center, on Opentrons Protocol Designer
If you’ve been saving time at the bench with Opentrons robots for a while, you might be familiar with Protocol Designer, our no-code protocol creation tool. Launched in 2018, Protocol Designer lets you visually design a protocol for the Flex or OT-2 robot. Simply click to add labware, hardware, and protocol steps. When you’re finished, a single click is all it takes to export your protocol file to run on your Opentrons robot.
Recent updates to Protocol Designer make it easier than ever to create and understand Python for Opentrons robots. At the Dolan DNA Learning Center in Cold Spring Harbor, Dr. Joeli Marrero’s student interns use Protocol Designer to create their very first pieces of code. “They did something amazing,” she says. “They took away that scary feeling of ‘I can’t do it’.” Most of Dr. Marrero’s students are brand new to using a robot in the lab, let alone writing code for one. After using Protocol Designer, her students feel more empowered to create their own protocols.
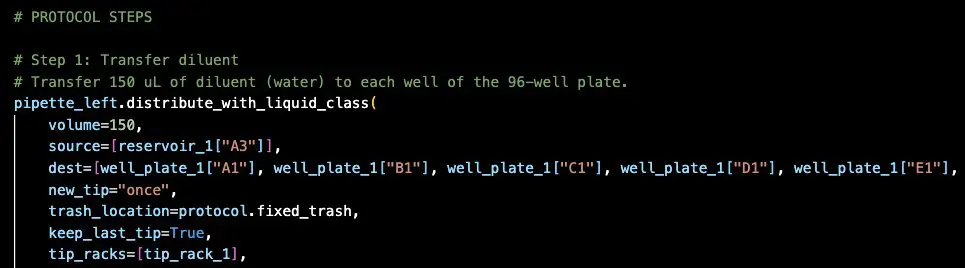
In 2025, Protocol Designer began exporting protocols in Python. Now, students like Dr. Marrero’s can visually create their protocol and read the code that communicates their steps to the robot. Let’s take a closer look at creating a simple serial dilution in Protocol Designer.
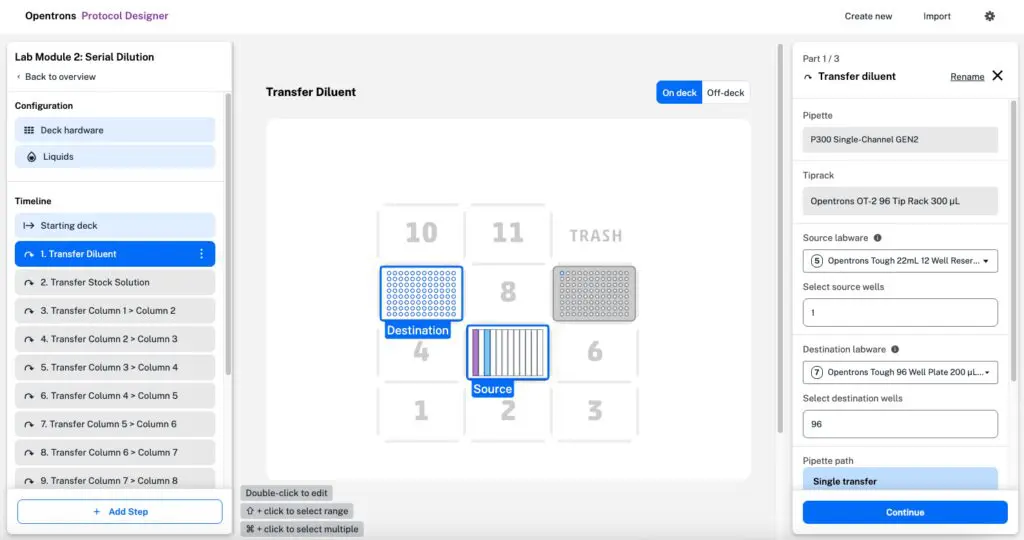
Protocol Designer includes a protocol timeline (left), and a view of the deck, including liquids, wells, and pipette tips (center). Try Protocol Designer for yourself in Google Chrome.
Students can start by building a protocol to automate a simple process, like the serial dilution in the example above. This is what you’d see if you were editing the protocol’s first step: transferring diluent to every well in a 96-well plate. Click Rename in the top right to add a custom step name and step notes to any step.
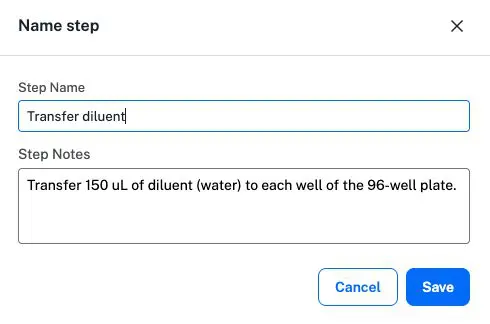
Custom step names and notes help students differentiate between multiple similar steps.
When students export their protocol, the custom step name and step notes are included side-by-side with the Python code that the robot uses to execute the transfer.
If your students are ready for the next step, Protocol Designer’s exported Python can take them from that “‘can’t do it’ feeling” to real automation, running in your classroom.
Ready for more?